TaxWorkFlow contains a built-in email client to allow you to work with your correspondence straight from the application. You can learn how to sync your existing email account with TaxWorkFlow at "Office settings" chapter. "Email sync troubleshooting" chapter will help you to address syncing issues.
To open email client go to Dashboard and click on the "Emails" tab.
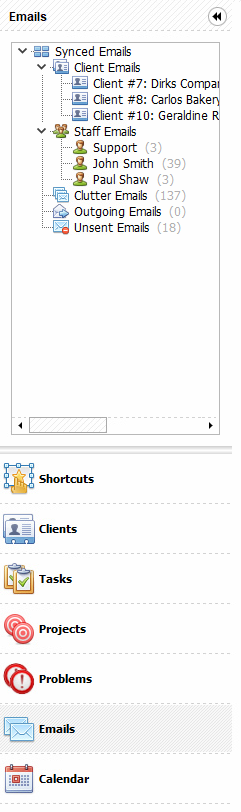
Above you can find a list of emails synced with TaxWorkFlow.
"Client Emails" group contains all messages linked to different clients. Select the client from the list and you will see all correspondence related to him and his associates.
"Staff Emails" group contains messages to your staff members.
"Clutter Emails" folder contains those emails that are not linked to any client or staff member.
"Outgoing Emails" folder contains those emails that were sent by you or by the system automatically. If the email was sent successfully it will be removed from the folder. If the email was not sent during one hour due to some reasons (ie incorrect outgoing email settings) it will be moved to "Unsent Emails" folder.
"Unsent Emails" folder contains those emails that were not sent by the application due to some reasons. Each hour the server will attempt to send emails from this folder. If the attempt is successful the email will be removed from the folder. Emails that must be delivered next business day are also stored in "Unsent Emails" folder.
Tip: "Use search bar and filters to find the message you need."
Please note, you can also find all messages related to certain client at the "Emails" tab of the "Edit Client" form.
From the Dashboard you can create new emails by clicking "New Email" button. Upon clicking "New Email" button "Edit Email" window will appear:
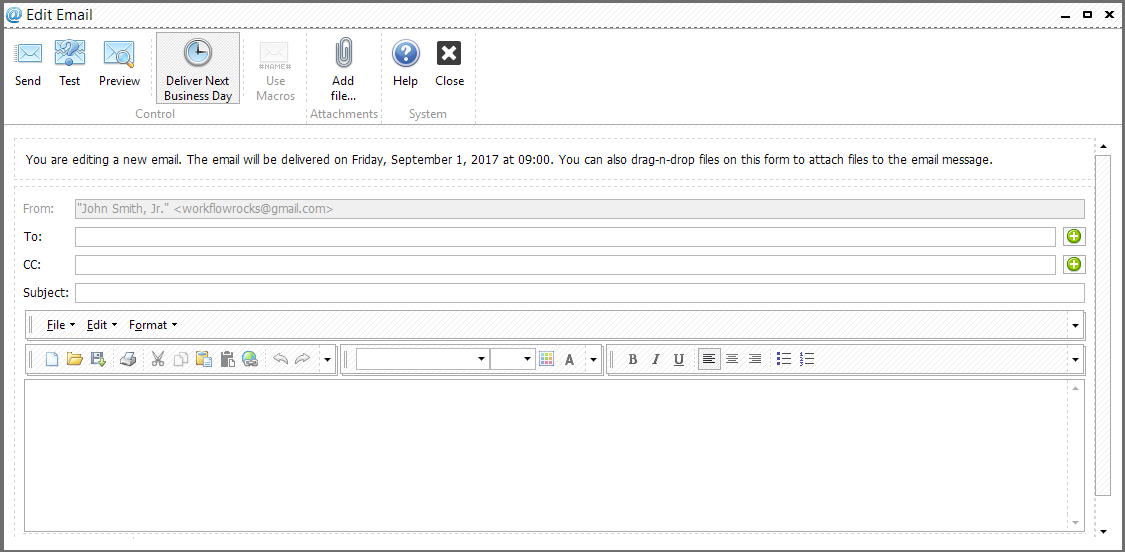
Here before sending a message you can test your outgoing email account, preview message and attach files to it. Click "Deliver Next Business Day" to postpone the delivery to 9am of the next business day. Use "Select User" and "Select Client" forms to find the recipient quicker.
Also the following actions are available from the Dashboard:

•Email to client - when client's email subfolder is selected this button allows you to email this client and/or his partner/spouse. Select a person you would like to email and a template from the list and the "Edit Email" window will appear
•Open email - opens selected email in the "View Email" window
•Edit email - allows to edit email and send it again
•Reply - allows to reply to sender
•Reply all - allows to reply to all recepients of the message
•Forward - allows to forward the message
•Assign email to a client - links email with the client. Relation with current client remains
•Assign email to a project - assigns email to an existing project
•Assign email to a task - assigns email to an existing task
•Assign email to another client - links email with another client. Relation with current client terminates.
•Unlink email - allows you to remove link of the message to the client or employee. This message will be placed in "Unlinked" group
•Delete email - deletes email
•Create project based on this email - creates a new project of selected type with selected email attached to it
•Create task based on this email - creates a new task with selected email attached to it
•Create problem based on this email - allows to create a problem for any task opened for the client. If the email is not linked to any client you can create problem for any task that is not linked to any client, too
•Solve problem based on this email - solves a problem based on this email if it was previously created
•Edit project - opens "Edit project" window if this email was already assigned to the project
•Edit task - opens "Edit task" window if this email was already assigned to the task
•Edit problem - opens "Edit problem" window if it was already created based on this email.